Do DYI K-Cups Really Save You Money?

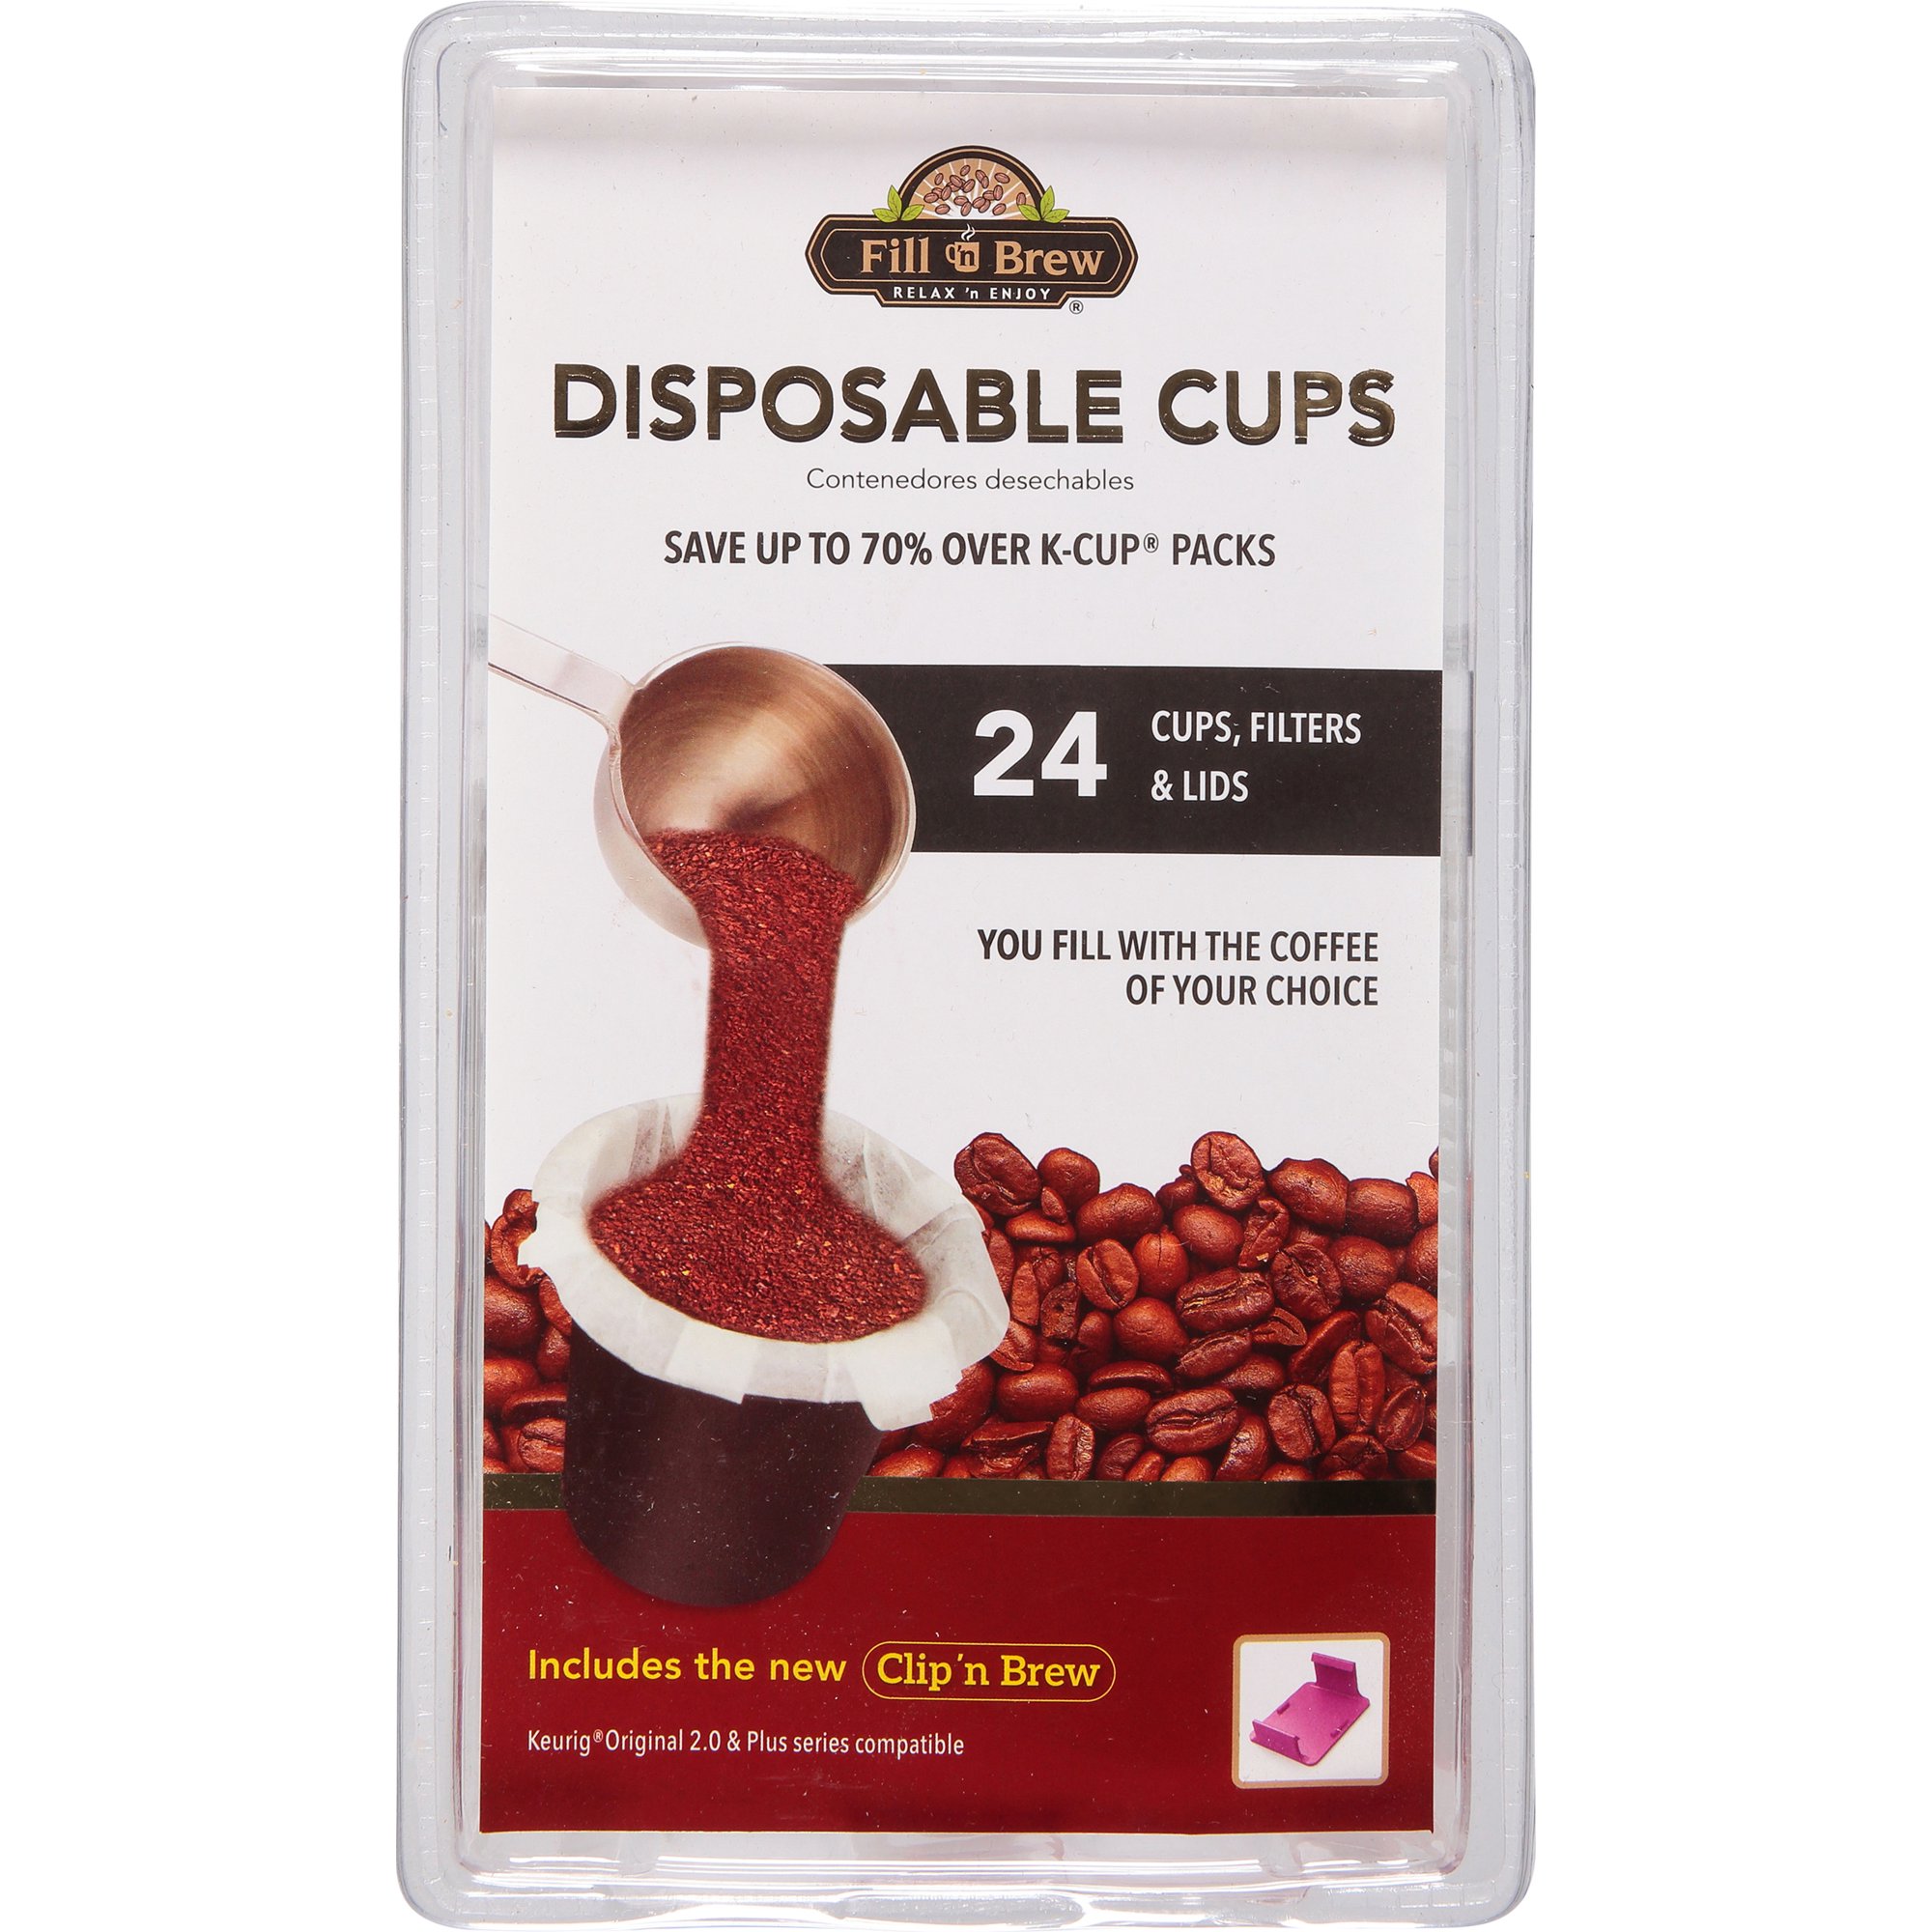
The Fill ‘n Brew disposable Cup Kit claims you can save up to 70% over K-Cup Packs. We did the math and we sampled the coffee this system offers.

The 24-cup starter kit, available at supermarkets and online.

The notion of do-it-yourself K-Cups has been around for almost as long as Keurig itself. The reasons for “rolling your own” cups are many, but the most-mentioned are:

  1. Save money.
  2. Use your own roast or pack a specialty roast
  3. Save money.
  4. Be a little greener by pulling the paper filter and grounds and composting them
  5. And finally, to save money.

The Fill ‘n Brew kit, distributed by Jacent Strategic Merchandising of Pennsylvania, contains the makings of 24 home made K-Cups. Purchased in the coffee gadget section of my local supermarket, the packaging boldly declares users could save up to 70% over K-Cup Packs. I honestly don’t recall what I paid for it at the store, but the same kit is available at the time of this writing for $5.49 at Walmart.com. The kit comes with two bundles of loosely-packed paper filters, the plastic cups marked with recycling type 5 (more on that later), clear snap on lids with pre-cut chad for a classic Keurig injector. Also included is a plastic support stand to aid in stabilizing the cup while the top is snapped on and an adapter clip intended for Keurig Plus models. Please note that this kit (as well as most DYI systems on the market) do not work with the latest “multi-stream” Keurig models currently available.

Fill ‘n Brew cup under construction. A scoop with a funnel keeps things neat.

How hard is it to use?

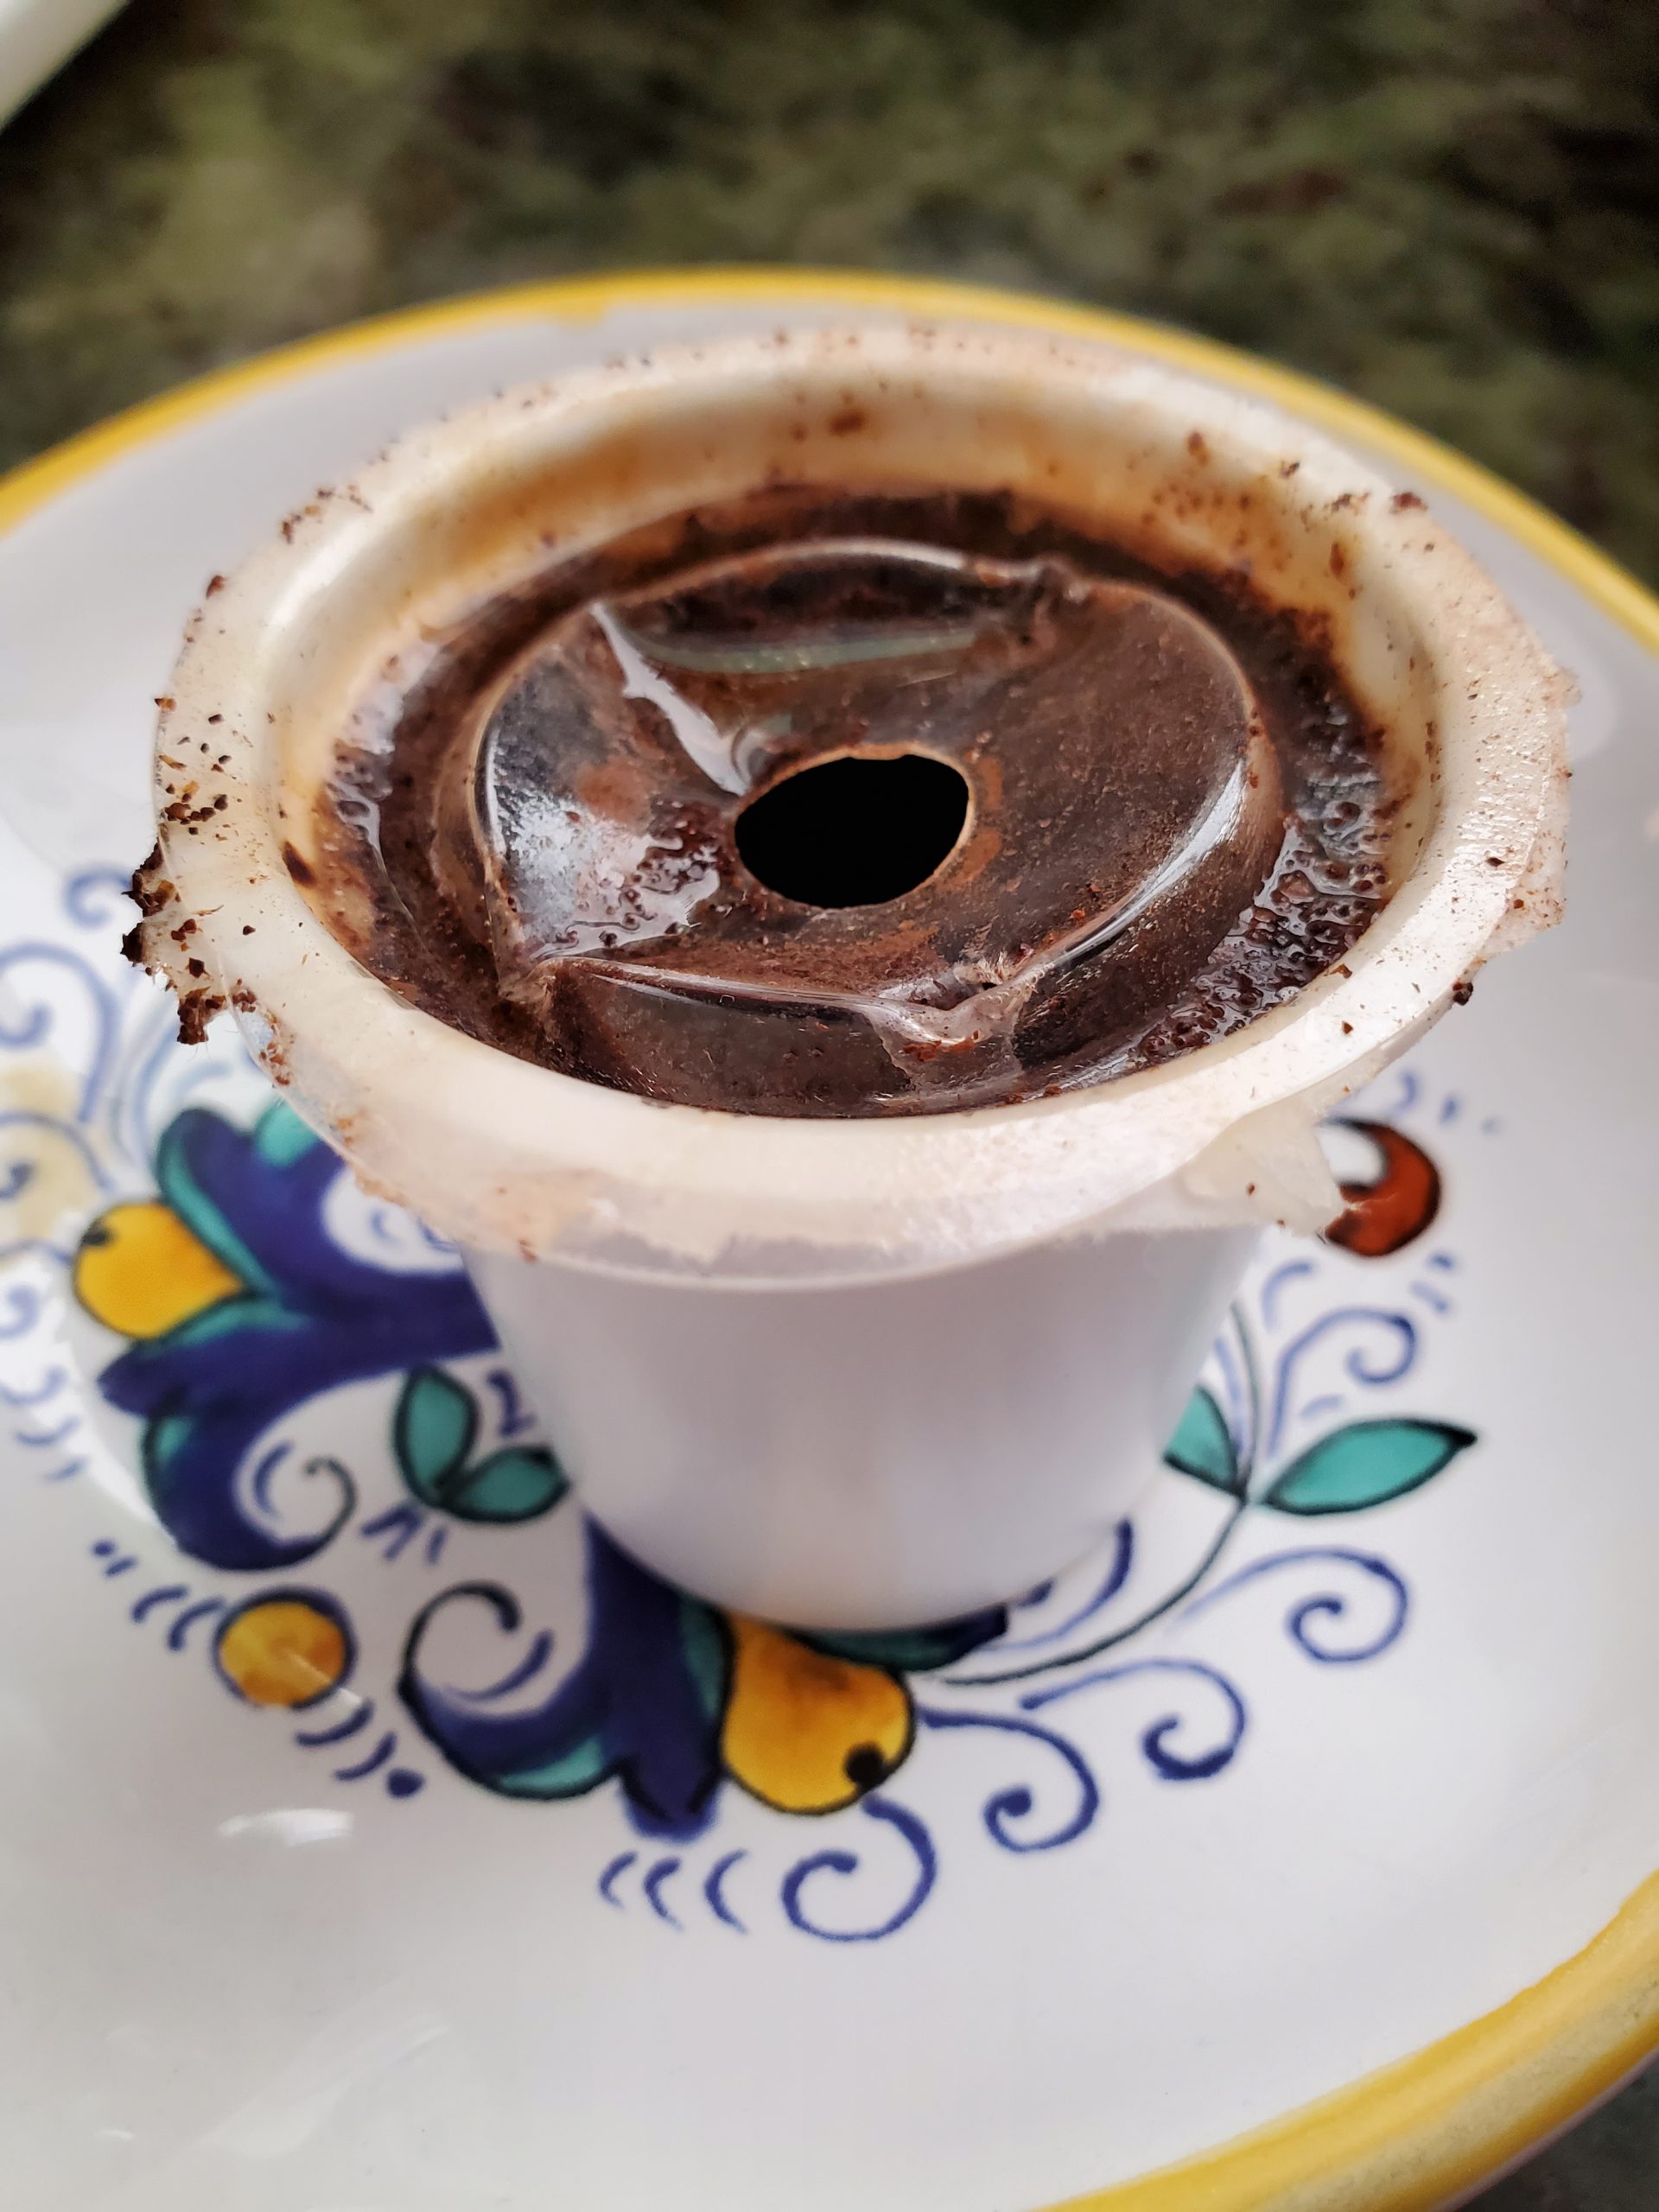
Kits like this will often have little issues an quirks. Many I’ve tried have the paper filters so tightly packed they are hard to separate. Others have loose fitting caps or lids that will leak or weep under pressure. I can report that I had no issues with the Fill ‘n Brew Kit. The filters separated easily for my hammy guy fingers and the supplied holder makes loading and capping the cup largely problem free.
I would suggest using a coffee measure that is narrow enough to let you easily pour into the mouth of the cup. A standard tablespoon measure is a little wide and some of your coffee will try to escape. A measure with a pour spout like this one was a real help.
I found that after the first couple, I could prepare and fill a cup in about a minute.

To offer the warning once again, this kit does not work with the more recent Keurig releases using multi-stream technology. I tried and I would up with a mess. The kit clearly states the cups will work with Keurig Original 2.0 and Plus series machines. Don’t try to sneak these into the new Keurig you just got for Christmas. You’ll be spending an hour cleaning up the mess.

The lids are NOT designed for the latest multi-stream Keurig models.

How’s the coffee?

I used Lavazza Classico pre-ground coffee for my testing. I found the filter would comfortably hold about a 1-1/4 tablespoon of coffee, which I think is a little light for a strong large cup of Keurig-brewed coffee (No, I didn’t weigh the individual portions, I wanted a cup of coffee, not a science experiment). I found cups brewed at the medium setting were of a good strength and pleasant to drink. No escaped grounds and the paper filter pulled some of the oil out of the brew, giving it a smoother taste than a cup made with a mesh screen cup. If you’re after a really bold cup, either go with a kit with a mesh strainer or one that can hold a greater coffee load.

Is it green?

No, not really. The cups are polypropylene, a plastic that is largely unrecycled. New processes are available to recycle this plastic, but don’t kid yourself thinking you’re doing Mother Earth a favor by using this kit. As a matter of fact, EVERTHING in this kit besides the filters, instruction sheet and front label is made of hard plastic. You can probably do some good by pulling out the used, wet filter and dropping the grounds into your garden, but that’s about it. It would be possible to reuse the individual cups a few more times with fresh filters and caps, but that gets to be a messy and laborious affair. Not recommended. The Keurig system was never focused on being overly green, and there really isn’t a good solution available at this time.

Is it cheap?

The claim that you can save 70% over store bought cups can be true if you compare the kit to the most expensive preloaded K-Cups available. I did the math and found that making my own from a 10 oz. bag of Lavazza and the Fill ‘n brew kit worked out to be about 50 cents a drink. To improve upon that cost in preloaded Lavazza cups one had to bulk purchase 160 from a vendor on Amazon. At my grocery store, the same cups cost $1.13 per unit when buying a little box of 10. So yes, the DYI route is worth it in money saved. The savings should get a little better when you buy refill filters, cups and caps.

Finding the perfect grind with my Gaggia MDF Grinder

When I first stepped into the world of coffee-as-a-hobby, my gear of choice was Gaggia. It offered an approachable price point and seemed to be a few rungs up from the espresso machines available at big box appliance stores.

The Espresso DeLuxe was a fine little beginner’s machine, and soon I lusted after a grinder that could do more than my “chopper” grinder’s whirling blades. I wanted something that would give me that fine, magic powder that would extend my shots and yield that mythical crema.

I stayed brand loyal (for cost reasons) and bought a Gaggia MDF Grinder. It was stout, heavy and had that mid-1990’s look and feel to it. It had the built in doser that I never really ended up using, but most importantly it had what seemed to be endless click stops for adjusting the grind. It wasn’t cheap – I recall $299 USD price tag. All reports I read indicated it was made to last, so I took the plunge

Losing My Steps – The cleaning accident

The MDF performed well for me, grinding both store bought roasts and my own attempts a roasting. I learned my way around the grind settings, picking my favorites for French press, drip, and espresso. I made a point of cleaning the MDF fairly often, as many of my favorite beans were oily and left a good bit of residue in the machine. During one cleaning, an accident happened. Once could say it was a “mis-step”.

The Gaggia MDF comes apart easily. Here are instructions on how to do it.

I had taken off the hopper and unscrewed the heavy brass carrier that holds the top grinding plate. As with all grinders, there were pockets of packed coffee grounds stuffed in the corners. I turned the unit over and shook out the old bean dust. Unfortunately, that’s when the accident happened. An essential part fell from the grinder and into the trash. Two indexing pins (they sort of look like dark metal bullets with a spring in the back) dropped out and I didn’t notice they were gone until I reassembled a few days later. Of course, the trash was long gone by then.

The indexing pins for a Gaggia MDF Grinder
These are getting rare, these are indexing pins for the Gaggia MDF.

I looked around on line and found the part at Whole Latte Love. For some reason I didn’t actually order them at the time. I’m not sure why I didn’t, perhaps my interest in coffee was on the lull, or I was making due with a KitchenAid Proline Coffee Grinder I had gotten hold of. I would try to use the once proud MDF every so often, but I had to now HOLD the hopper at the correct grind number while grinding, something that never gave good results.

The Gaggia MDF wound up sitting in my parts box for about six years.

Unused. Forgotten.

I recently experienced a rekindling of the coffee hobby with the gift of a Rancilio Silvia espresso machine. I tried using store-bought ground coffee, but found myself unhappy with the resulting too-fast shots and lack of crema. I went back and dug out my old Gaggia MDF.

I knew I had to fix the indexing problem. The indexing “bullets” were still available, but the compression springs were not. I had to try and hunt around at hobby shops or online to find these tiny springs. Wanting to get this grinder back in service, I chose to try a “mod” or modification that coffee forums had suggested. It allowed the MDF to become “step-less” and do away with the indexing bullets.

The method is described here in a 2009 post on home-barrista dot com. It involves disassembly of the unit down to unscrewing the upper plate carrier, cleaning all the coffee dust and oil from the actual grinding area, and then wrapping the fine threads with teflon pipe wrapping tape. The teflon tape is wrapped around the threads 5 layers deep so the act of screwing the upper plate carrier (and thus adjusting the fineness of the grind) requires a good bit of hard twisting. This stiffness will keep the grinding plates at exactly the spot you selected, making it possible to grind at 2.5 steps or 3.75 steps.

I did the mod (after a complete cleaning of all parts and surfaces) in about 10 minutes. It was truly easy and works exactly as billed. Now, I have my grinder set to about a 3.25 setting or so and getting store-bought whole bean coffee to yield great flavor and amazing crema.

If you have one of these grinders, they are worth cleaning and putting back in full service. Do this modification if you dare, so for my results have been worth it. If anything CLEAN your grinder by taking it apart, as there is no substitute for a detailed wipe down and wash. Your coffee will thank you for it.

Lifeboost Lux: A taste of rare and exceptional coffee … that’s within your reach.

Life is filled with rare temptations. Events or items that because of location or expense we choose to do without. That doesn’t mean we no longer want them, quite the opposite. Often those things that seemed reserved for the few or the entitled become the focus of our desires. Items we’d like to obtain … at least once in our lives.

The work-around is to enjoy something rare and expensive for a *short* while. Maybe RENT a supercar for a few hours (and pray you don’t get into an accident) or spend an afternoon shopping for the perfect 10-thousand-dollar handbag. This gives you a “taste” of the rare and expensive, without having to take out a second mortgage on your house.

Lifeboost Coffee offers a similar solution to sample what would otherwise be too expensive for most mortals. They offer a sampler of highly regarded single-origin coffees that will give you a taste of what is usually reserved for the very well heeled. It is their “Luxe” sampler of coffees.

Three bags of Lifeboost LUXE coffee.
A gift selection of three coffees described as “delicious, rare and exotic” from Lifeboost Coffee

Lifeboost Coffee calls this line a “Delicious, rare, exotic coffees for true connoisseurs” and it comes packaged in deluxe resealable bags holding 10 ounces (283.5 grams) of each coffee. The gift set that I received came with three different roasts, Java Blue from Indonesia, Pacamara from El Salvador and Ethiopian Yirgacheffe. Each are delivered as whole bean.

Let me start by saying that all these coffees were delicious, flavorful and clearly very special. I prepared each type by applying a drip grind and preparing in a french press. Instructions provided with the purchase offers a starting ratio for brewing, but encourages experimentation to find a preferred strength. The resulting brews were very clean tasting, with strong, unmuddied characteristics of single-origin roast. They all offered very subtle fragrances and tastes that comes from the bean itself, with very little impact from the chosen roasts.

While Ethiopian varieties have never been my favorites, I did enjoy this one for its wide range of flavors, with hints of blueberry, peach and floral scents. I must congratulate the roaster for hitting this batch just right, the flavor is all in the bean with very little roasting characteristics taking over. The magic here is in the subtle characteristics of the cup, there’s a ton going on and all of it is good.

The Java Blue from Indonesia makes good on the promise of a premium mountain-grown coffee. I found it very smooth and full of flowery hints. Again, it is all about the bean and the roast is perfect to bring out all the intricate flavors.

My favorite is the Pacamara, an El Salvador bean that is big in size and big in flavor. I am a fan of strong mouthfeel and flavor and this one has it by every measure. While the other two are coffees to be savored like an expensive wine, the Pacamara is strong enough to be gulped with gusto. The coffee is powerful and delicious and can be “manhandled” and not lose it’s premium qualities. Great stuff by any metric.

Enjoying truly premium coffees like this comes with a premium cost. The Lux collection from Lifeboost is by no means a value purchase. Each of these ten-ounce bags sells in the $50 dollar range, or about $150 dollars for the gift selection of three. That works about to around $80 a pound for each of these single-origin roasts, making it the most expensive coffee I’ve ever reviewed. It is worth it? If you want to drive that supercar or handle that 10k handbag to say you had the experience, yes it is worth it. If you want to treat your coffee-crazy companion to a treat that will be remembered for a long time, this is it. This is some of the best coffee anywhere, and it is delivered at a roast perfect to bring out the best in the bean. I won’t be ordering a continuing subscription on these coffees, as I like finding the best tasting coffee within a realistic budget. And $80 USD a pound is simply not realistic. But to say you’ve had what could be argued as the rarest, most sought-after coffee in the world – just this once – the price tag is worth it.

KitchenAid ProLine Grinder Update: drip’s the best

I wrote a review of a KitchenAid ProLine Grinder a few days back.

In it, I pointed out that while billed as a near commercial level grinder, it was unable to grind fine enough to make espresso in my Rancilio Silvia. I recently cleaned and re-calibrated the unit, and a selecting 5.5 on the 1-8 setting dial delivered chunky, uneven pieces, perhaps suitable for a French press.

I blamed the burrs, which in my opinion were not sharp. They seemed to be made of a soft metal that did not keep the edge. I ordered a replacement set and comparison of the two burrs will come up in a future entry.

Anyway, after further fiddling, I found I could create a decent DRIP coffee grind at about 6.5 out of 8. This made a nice drip cup and worked well in a Kurig as well. But the point is made: If I have to dial it to 6.5 out of 8 to get a grind fine enough to just make a decent drip coffee, there is no way this device can put out a fine espresso grind, new burrs or not.

I will prove myself right or wrong in a future entry when I install the new burrs. Meanwhile, the KitchenAid ProLine Grinder is more of a wood chipper than a coffee grinder.

Review: KitchenAid ProLine Coffee Grinder

A photo of the KitchenAid ProLine Coffee Grinder
Stylish and imposing, the KitchenAid ProLine Grinder has a fatal flaw.

A machine that looks the part,
but fails to deliver.

KitchenAid is a brand that evokes a sense of heavy duty service and product overdesign. Anyone over 40 has their mother’s KitchenAid Mixmaster processor up in the pantry or on the counter, possibly the same unit they watched in action as a little kid. KitchenAid products are highly regarded and command a premium price at stores.

Based on the legacy of the brand, a buyer might expect KitchenAid to produce a coffee grinder that’s the best of the best, ready for generations of grinding.

Unfortunately, they have not.

The KitchenAid ProLine Grinder is a flawed machine, and the flaw comes down to the design and manufacture of one important part.

Let no one say that the grinder itself isn’t a beautiful design. It lifts styling cues from the Mixmasters of the past, and uses a hopper and container system that reduces static fly-away issues and keeps the device looking really clean. It is darned heavy as well, just like your Ma’s Mixmaster.

But users will notice that this is not the machine for grinding espresso. Not even close. Espresso requires a very fine grind, in some instances just microns sort of a fine powder. It also needs to be very uniform in consistency or the pressurized water will sneak by the “boulders” in the puck and yield a watery shot. This machine was never able to grind to anywhere near this fineness. Even after several attempts at re-calibration, the very best I could get was a chunky grind applicable for drip coffee. If you’re interested, here’s KitchenAid’s page on cleaning and recalibration.

Chunky, non uniform fragments of coffee at step 5.5 out of 8 (8=finest)

So what’s up with this problem? An assembly problem? No, it’s a beautiful machine. An issue with the hopper? Nah. It all comes down to what may be the very heart of any coffee grinder: the burr plates.

The burr plates are the teeth of the system. They break up the coffee beans into small, hopefully uniform particles of ground coffee. The grinder has a powerful, slowly rotating motor that will smash the beans as they fall between two burr plates. One plate is spinning, the other is fixed. A good set of burr plates will cut into the beans instantly and pulverize them to a specific uniform consistency.

But not in the KitchenAid. The edges of the cutting pattern has very little of the sharpness needed to bite into the beans. As discussed on several internet forums, the plates seemed to be cast from a metal that loses what little edge they have very quickly. I noticed my grinder outputting a coarser grind within a few months of use. Cleaning and adjusting did no good, and after a recent tear down for cleaning it seems the burr plate is no more than some textured ripples in the metal. This is after only moderate home use.

Image of KitchenAid Burr Plate
The Achilles’ Heel. Does that look like stainless steel to you?
Photo: Via Facebook

For the record, some 3rd party vendor sites indicate the burrs are made of stainless steel. I have examined the ones out of my machine and they are made of a completely different metal than the ones from my Gaggia MDF, which are clearly made from a very hard steel that holds its edge.

I have found a replacement set of burrs for the KitchenAid on an auction site. In a later blog entry I will compare new and old burrs and update the grinder’s performance.

The only other comment I have currently on the KitchenAid ProLine Grinder is the fragile ground receptacle. This small customized bowl fits perfectly under the grinding chamber, minimizing static flyaway. It also looks really nice as part of the overall design. The down side is the bowl is made of rather thin glass and will crack or chip with a forceful bump. Think wine glass sort of thickness. Because this bowl is constantly being handled, chances of cracking this vessel is pretty high. It’s not cheap either. A scan of online parts resellers show prices between 25 and 35 dollars in June of 2019.

We’ll see how the new burrs help, but if you’re considering this grinder for 200 dollars, I suggest holding out for another 100 dollars and getting a Barzata Sette or even a Rancilio Rocky. The extra dollars are worth the trouble.

A K-cup Familiar To Our Canadian Friends

In the States, you can pick up a rock and toss it in any direction … and hit a Starbucks.  In Canada, it’s another name and store.

Most Canadians will understand a visit to Timmy's."

Most Canadians will understand a visit to “Timmy’s.”

I spied a new coffee offering in my supermarket K-cup display.  This one is marked with a logo familiar to many who call Canada home. “Tim Horton’s” is very similar to Duncan Donuts here in the US, a nice little store that can be found pretty much everywhere.  They serve lots of good coffee along with some of the most decadent pastries I have ever seen.  Yes, they are mostly donuts and their variants, but I’ve personally never seen a collection of colors, frostings, sprinkles and fillings like I did at a Tim Horton’s in Ontario some years back.  They are everywhere, and they are always, always occupied with hordes of locals tossing back coffee and packing away calories to fight off the cold.

I had a cup of the standard drip, prepared “regular” which means sugar and cream.  It tasted quite satisfying, a dark, full bodied roast that stood up to the add ins.  Maybe it was the cool air, but I recall the smell of the brew to be particularly attractive.  It was full and fresh, just a few minutes old.  I had it with a glazed donut of some design and called it breakfast.  A happy memory which always leaves me wondering why “Timmy’s” as the locals sometime call their stores haven’t tried a legitimate expansion into the United States.  There’s always room for good coffee and donuts in my opinion.

Anyway, I was brought back to this experience when I saw Tim Horton’s cups in the supermarket.  I was only able to snag a decaf box, as all the regular seemed snapped up. (Hmmm…. maybe people DO know about Horton goodness here in the Southern United States).  While I would have preferred the regular for a test drive, I’ve been sampling the decaf over the past few days.

I was wondering if this K version of this memorable cup could live up to my expectations.  Rarely does popular coffee outlets make the jump to the Keurig Universe without bumps and jolts.  Horton’s was not an exception.

The actual cup is a rigid side version, not one with the expanding folds that are filtering into the market.  It worked without issue in my machine, and when set to the large mug size offered a slightly weak looking cup of decaf coffee.

The flavor of the coffee was a bit on the bright side, more of a medium roast than anything taking on a lot of roast characteristics.  It was by no means bold.  This particular K-cup yields better when set to a medium mug setting, and there’s no way to steal a second brew.  I want to say that the decaffeination process steals a good bit of personality from these beans and what you get is a cup that tastes … just okay.  Not horrible and I will finish the box, but not something you make a special trip for.  And it is certainly not in agreement with the robust and heat-giving cups that the real Horton’s serve north of the border.

This is not complete thumbs down.  It is a satisfactory cup of decaf, just nothing to write home about.  Especially if your home is in Canada.  I will keep an eye open for the caffeinated version at my local store and see if that fares any better.

Update: verdict on horton’s regular coffee k-cup

I was able to find and sample Tim Horton’s regular coffee in K-Cup.  Again, it was satisfactory, but not a coffee that you would want to drive across town for.  It is not the cup you’ll get at a Tim Horton’s Bake Shop.  The brewed cup is overly bright and thin, with some grassy aftertastes that I did not find overly pleasing.  Like the decaf version, this cup is simply “okay,” but not a brand you would consider paying a premium for.  Is it the exact same stuff they brew in the restaurants?  Perhaps, but the translation to the Keurig system and the very short brew time may limit how well this brew can match the store brewed cup.

The upshot:  If you have access to Timmy’s, simply drive in and grab a cup, maybe some baked goods.  You’ll spend about the same money as you would on a 12 pack of these cups and have a much better time.

Keurig works up a froth with Gevalia

Mocha Latte is the R rated version of chocolate milk.
I say that because Moca Latte has a smooth creamy favor.  It has a yummy mouth-coating quality that lingers like a melting malt ball.  It’s a kid’s dream, thick and luscious with a flavor so fat it hangs like a froth mustache on your upper lip.  But moca has some forbidden qualities as well.  It has the very grown up nip of a dark roasted espresso and a nutty fullness that wins out over the sheer sweet that children would prefer.  Most kids I know would take a sip and then stick out a tongue in defeat.  So close, but yet so far in children’s terms.  But a nice mocha can be just the ticket to the adult tongue.

But what has all this frothiness have to do with Keurig?  Drop in a cup and get a cup of coffee – no froth allowed.  Or is that actually the case?

Image of Mocha Latte box

Gevalia’s Mocha Latte “Kit”

Keurig gets complex with Gevalia’s Mocha Latte 2 part kit.

Gevalia, who has entered the K-arena with some wonderful coffees, as introduced a 2 part kit for preparing a frothy cup of moca latte.  The kit consists of a powder packet that is poured dry into the bottom of the coffee cup.  Then a quite ordinary looking K cup is placed in the holster.  With the machine set to a medium cup size, the hot water passes though the coffee …. and magic takes place.

2013-12-24 09.57.45

As the hot coffee hits the powder, a reaction occurs.  The powder in the cup begins to pop and sputter to life, creating a blanket of foam about a half inch thick.  As a man who grew up in the United States, I am reminded of a popular candy called “Pop Rocks” that would sputter and crack once exposed to whatever corrosive qualities my saliva contained.   You can give it a few stirs with a stick or a spoon to mix in all the powder, and you wind up with a cup of mocha latte that looks and smells pretty good.  There’s still a few pops and cracks, but that fades quickly leaving a nice cup of foamy drink.  A little squirt of canned whipped cream makes this an impressive looking treat.

The impressive fireworks aside, how does this powdered “latte” foam actually taste?  The best way is to tell you what it is NOT:

1.  It is NOT truly frothed whole milk with lots of fat and all the things that make a latte like this stick to your ribs, among other places.

2.  It is NOT Cremora on steroids.  It has a true coating quality that offers the impression of something containing significant milkfat.  There’s mocha flavoring in the powder as well, and while it isn’t overhelmingly “malted” it is a pleasant taste that works well with the brewed coffee.

3.  It is NOT an uncompromising replacement for a coffee house mocha latte.  You want the real deal, you’ve got to put on your coat and go get it or invest in a whole lot more equipment than a Keurig.

4.  It is NOT expensive in calories.  Gevalia clams 80 calories per serving.  You have to stay away from any extra sugar or whipped cream to stay on that target.

5.  It is NOT expensive in money, relatively speaking.  At the time of this writing, Amazon.com was selling in bulk (36 cups) for 1.22 a cup.  compare this to 4-6 dollars for a store made beverage and it’s a good deal.  Compare it to a nice, simple cup of really good Joe and yeah … it’s a bit of extra change.

Gevalia did very well with this tricked out powder and K-cup combination.  It is a worthy, quick and easy cup that you can offer a guest or whip up for yourself.  It is a great way to avoid a fattening desert and it will leave you feeling quite happy that you’ve had something naughty to drink.

The Coffee Whisperer recommends Gevalia’s Mocha Latte for Keurig!

Keurig Tip: DON’T wait for the “De-scale” warning to come on!

Have you noticed that the Keurig you got about 10 months ago is sounding horrible? Rattling and groaning with each sip of fresh water?  Before you start cursing the cheap build of the K-line of machines, there is one remedy you need to try.  I did, and it possibly saved me from buying a whole new machine for the new year.  It might save you too.

I don’t know about your Keurig use, but the one in my household gets beaten on pretty severely each day.  Maybe 6 cups are brewed each and every day without fail.  The big cups too, so what is that?  Six times grande times seven days times four weeks times twelve months …. what, about 23 thousand gallons of brew?  Well maybe not that much, but it’s still a lot.  And that water has a tendency to leave deposits and gum up the machine.  You need to pay attention to that scale, because it is a silent killer.  It is the cholesterol of the Keurig, and soon your K will be DOA if you don’t clean it out often.

I employ a very simple (and recommended) process of cleaning the device.   I offer the following for entertainment only and if anything at all goes wrong at any time in any place in the known universe I can’t be held responsible.  In other words, use this at your own risk.  (Sorry, lawyer repellant)

First, run all the water out of the Keurig by dispensing hot water until the “Add Water” light starts to blink.   Then remove the water tank and empty out the water that remains.  Put it back onto the machine.  Then fill it completely to the rim with WHITE VINEGAR from a gallon container.  PLAIN WHITE Vinegar, please, nothing else, nothing flavored.  Allow the Keurig to suck some of the vinegar into it’s plumbing.

Run a large cup through your machine to make sure that there’s nothing but vinegar in the device.  Then let it sit for about 5 minutes.  Run another cup through.  You will get a wonderful cup of hot vinegar, a great way to open your sinuses.  Then after another 5 minutes, run another cup through.  Keep tossing the old vinegar and refilling the cup every 5 minutes until the “Add Water” light blinks on.

Pop off the tank, dump the remaining  vinegar.  Rinse under the tap completely until the smell of vinegar seems removed.  Then replace the tank on the Keurig and refill with clean tap water.  Run this too through your machine, except you need not wait 5 minutes in between.  Just run it through.

If you have no interest in being super detailed, you can simply stop there.  Rinse the holster with tap water and refill with your preferred source of brewing water and you’re done.  This should eliminate most scale and keep your machine happy and clean.

Do this every three to six months (depending how much minerals are in your water) and your K machine will thank you with many happy, trouble free cups of java!

Black and Decker coffeemaker recalled, 68 injured

A popular space-saving under cabinet coffee maker has been recalled by Black and Decker.  The recall involves about 159,000 units sold under different model designations.

Here’s a link to CNN’s telling of the story.

Are you being green, or are you being cheap?

When I was a kid, mom and dad would buy soft drink by the six pack.  We would open each 12 ounce can by it’s pull tab pop top.  I would quickly consider the killing power of the aluminum pop top, perhaps running my thumb daringly along one side.  Just as quickly, my tadpole brain would turn again to the sweet soda awaiting me.  With a practiced flick of my hand the pop top would go sailing into the street.  Or the grass.  Or into the water … but never in the trash.

I can't tell you how many of these I happily ripped from the top of soda cans.

A few long chugs later (young boys never sip carbonated drinks, you can’t build up a decent belch that way) the can was ready for disposal.  In those days the can was really a CAN, rolled and stiff.  It wouldn’t collapse in your hand unless you were Larry Czonka or that guy on “Kung Fu.”  I was limited to stomping on it with my foot, twisting it into an angular arc. Sometimes this too would find itself dropped into a bush or  behind a park bench.

The final littering crime was interestingly the one that concerned us the least.  We would take the clear plastic ring and often toss it into the waterway and watch it float away.  It was small, nearly invisible compared to the twisted metal can … but as we all know now, it was a danger to marine life and for all practical purposes it would never fall apart and go away.

Back in the 1970s, we didn’t really understand.  We thought it was all about keeping things pretty.  “Keep America Beautful” was the saying on TV.  But beauty was only a small part of it.  Something that every schoolchild knows and understands.

The first real anti-pollution campaign, circa 1971

Fast forward to modern day.  We are a smart, green, earth-loving population.  We also love our coffee.  So a great many people have raised an eyebrow to the Keurig system and it’s disposable plastic cups.  How can an educated, love-the-mama coffee drinker continually toss plastic and foil cups into the landfill with every cup of joe he consumes?

Some folks just shrug and toss back their java.  No belching, however.  There are others that look for a better, cheaper way to love their Keurig and love-the-mama.  And that is a reusable cup system.  We’ve looked a a few here at the Coffee Whisperer, and now here is one that seems too simple to work well.

But it does.

My-Kap is a small, plastic top that will fit into the open top of a used Keurig coffee cup.  It has the look and feel of a poker chip, and you have to fight the urge to flip it into the air like a movie gangster.  It has a hole in it’s center for the infusion of hot water.  If you’re like me, you’d guess this thing is too simple to work well in the long run.  It’s got to leak or make a mess or something.  But in practice working with it is very simple.

A My-Kap set, available from Amazon. Note the brush is NOT to scale.

You have to start with a freshly used K-cup.  Yes, you are reusing the plastic cup … and the paper filter inside.  Yes, I know.  Reusing a coffee filter?  It does sound bad, but in practice the offense is small.  More on that later.  Preparing the used cup is simple.  use a scissor or a small knife to enlarge the entry hole in the foil top.  You are trying to preserve the paper filter inside, so don’t get too crazy with your cutting.  Just enlarge the hole enough so you can get a finger in and start slowly peeling the foil back to the cup’s edge.  The foil might give away cleanly, or it might leave a small strip along the top of the edge.  This won’t matter, as the My-Kap slips inside the lip of the cup and form it’s seal there.

VIDEO: Preparing a used K-Cup Video

To clear the old coffee out of the cup, simply hold the cup under running water.  The old grounds are flushed out easily, and for coffee that’s reluctant to leave My Kap supplies a small brush.  The brush helps to clear out the folds of the paper filter with a few whisks.  The brush came with a 3-Kap retail package from Amazon, which cost about 10 dollars.

After cleaning, you can immediately reload the cup with coffee, or set it aside to allow the paper filter to dry.  I found I can fill a cup with about a heaping tablespoon of ground coffee.  A medium grind, or a grind intended for “drip” seems to work the best.  Once filled, simply press the My-Kap disk into the top of the cup, in a fashion similar to plugging a bottle with a cork.

Then, simply load the cup, and use it just like a regular Keurig cup.  The quality of the coffee is really pretty good, perhaps better than mesh screen based replacement cups, since those seem to deposit more sediment in the bottom of my cup.  The paper filter seems to block most of the sediment and gives you a fairly clean cup.

VIDEO: How to refill a K-Kup using My-Kap system

On the subject of the filters: it is easy to raise an eyebrow over reusing a paper filter.  The filter does absorb a good bit of the oil and fine sediment that would make a cup bitter.  But in practice, I found the contamination I expected wasn’t really very apparent.  I didn’t note a great deal of degradation over multiple uses and I didn’t detect any real “cross-contamination” between coffee flavors.  Now, I did not try this with a flavored dessert coffee with a strong additive, so your mileage may vary.  In spite of my findings, many folks would prefer a clean paper filter and the folks at My-Kup is providing paper filters and templates to construct entirely fresh Keurig cups.  I did not try the paper filters; as I think the hassle factor in “gutting” a little plastic cup and re-lining it with fresh paper totally negates the convenience of the Keurig system in the first place.  My advice, try the replacement kaps first, and if you can’t handle the old filter, move to a mesh screen solution.

VIDEO: Cleaning a My-Kap prepared Keurig Cup

I found a few negatives with the My K-Kap.
First, I found my assembled kups would leak around the top a bit.  This isn’t a show stopper, as the excess water simply runs around the holder and then down into your coffee cup.  There’s a wipe up factor, and the leaked water will leave some sediment that will, over time, goop up your holster.  Popping the holster out of the machine and giving it a quick rinse is simple and something you should do anyway.

Next, if you wish to reuse the used cup (I’ve gotten 5-6 uses out of a single cup, just turning the cup so the bottom hole is freshly punched each time) you have to rinse the silly thing out.  This involves removing the My-Kap insert.  You need to a tool to do this easily, as there’s no exposed edge for you to pry upward.  I used the handle of the supplied brush, or you can use the tine of a fork.  The folks at My-Kap have an accessory to do this, but a fork seems to work fine.  But again, there’s additional hassle factor, and that is not what made Keurig what it is.

My take:  I thought that the My-Kap was going to be a half-baked solution to reusing Keurig plastic cups.  I felt that the whole-cup solutions discussed elsewhere on this blog would clearly be the “right” way to tackle the waste problem (and cost problem) inherent in the Keurig system.  But I was wrong.  The My-Kap approach is simple, very cheap, and really not that much of a hassle.  You can get about 4-5 easy reuses of the old cup, radically driving down your cost per cup of coffee.  It works, and as long as you’re willing to deal with a paper filter that’s no longer virginal ( I like “seasoned”) it makes a pretty good brew.

Best of all, you’ve saved another few ounces of plastic from being landfilled.  There’s a pop-top sitting buried deep in a Florida landfill with my name on it.  I didn’t know any better then.  I do now, and with a small bit of effort I can save some money and in a very small way help keep the world beautiful.