Tag Archives: coffee

Lifeboost Lux: A taste of rare and exceptional coffee … that’s within your reach.

Life is filled with rare temptations. Events or items that because of location or expense we choose to do without. That doesn’t mean we no longer want them, quite the opposite. Often those things that seemed reserved for the few or the entitled become the focus of our desires. Items we’d like to obtain … at least once in our lives.

The work-around is to enjoy something rare and expensive for a *short* while. Maybe RENT a supercar for a few hours (and pray you don’t get into an accident) or spend an afternoon shopping for the perfect 10-thousand-dollar handbag. This gives you a “taste” of the rare and expensive, without having to take out a second mortgage on your house.

Lifeboost Coffee offers a similar solution to sample what would otherwise be too expensive for most mortals. They offer a sampler of highly regarded single-origin coffees that will give you a taste of what is usually reserved for the very well heeled. It is their “Luxe” sampler of coffees.

Three bags of Lifeboost LUXE coffee.
A gift selection of three coffees described as “delicious, rare and exotic” from Lifeboost Coffee

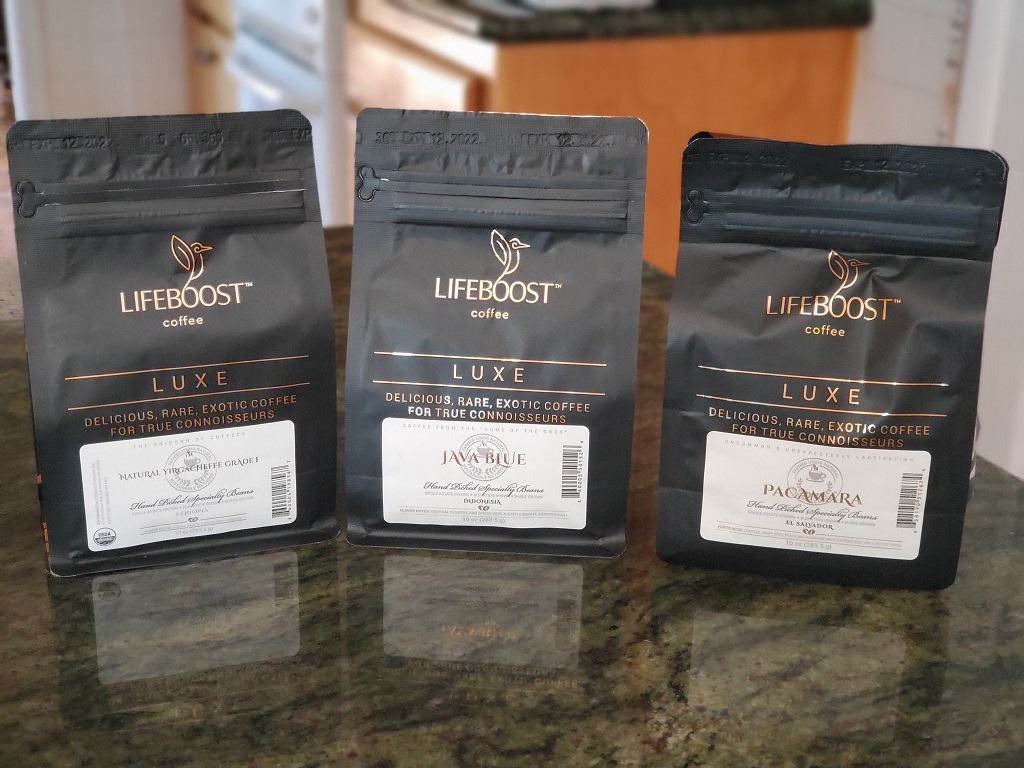
Lifeboost Coffee calls this line a “Delicious, rare, exotic coffees for true connoisseurs” and it comes packaged in deluxe resealable bags holding 10 ounces (283.5 grams) of each coffee. The gift set that I received came with three different roasts, Java Blue from Indonesia, Pacamara from El Salvador and Ethiopian Yirgacheffe. Each are delivered as whole bean.

Let me start by saying that all these coffees were delicious, flavorful and clearly very special. I prepared each type by applying a drip grind and preparing in a french press. Instructions provided with the purchase offers a starting ratio for brewing, but encourages experimentation to find a preferred strength. The resulting brews were very clean tasting, with strong, unmuddied characteristics of single-origin roast. They all offered very subtle fragrances and tastes that comes from the bean itself, with very little impact from the chosen roasts.

While Ethiopian varieties have never been my favorites, I did enjoy this one for its wide range of flavors, with hints of blueberry, peach and floral scents. I must congratulate the roaster for hitting this batch just right, the flavor is all in the bean with very little roasting characteristics taking over. The magic here is in the subtle characteristics of the cup, there’s a ton going on and all of it is good.

The Java Blue from Indonesia makes good on the promise of a premium mountain-grown coffee. I found it very smooth and full of flowery hints. Again, it is all about the bean and the roast is perfect to bring out all the intricate flavors.

My favorite is the Pacamara, an El Salvador bean that is big in size and big in flavor. I am a fan of strong mouthfeel and flavor and this one has it by every measure. While the other two are coffees to be savored like an expensive wine, the Pacamara is strong enough to be gulped with gusto. The coffee is powerful and delicious and can be “manhandled” and not lose it’s premium qualities. Great stuff by any metric.

Enjoying truly premium coffees like this comes with a premium cost. The Lux collection from Lifeboost is by no means a value purchase. Each of these ten-ounce bags sells in the $50 dollar range, or about $150 dollars for the gift selection of three. That works about to around $80 a pound for each of these single-origin roasts, making it the most expensive coffee I’ve ever reviewed. It is worth it? If you want to drive that supercar or handle that 10k handbag to say you had the experience, yes it is worth it. If you want to treat your coffee-crazy companion to a treat that will be remembered for a long time, this is it. This is some of the best coffee anywhere, and it is delivered at a roast perfect to bring out the best in the bean. I won’t be ordering a continuing subscription on these coffees, as I like finding the best tasting coffee within a realistic budget. And $80 USD a pound is simply not realistic. But to say you’ve had what could be argued as the rarest, most sought-after coffee in the world – just this once – the price tag is worth it.

Review: KitchenAid ProLine Coffee Grinder

A photo of the KitchenAid ProLine Coffee Grinder
Stylish and imposing, the KitchenAid ProLine Grinder has a fatal flaw.

A machine that looks the part,
but fails to deliver.

KitchenAid is a brand that evokes a sense of heavy duty service and product overdesign. Anyone over 40 has their mother’s KitchenAid Mixmaster processor up in the pantry or on the counter, possibly the same unit they watched in action as a little kid. KitchenAid products are highly regarded and command a premium price at stores.

Based on the legacy of the brand, a buyer might expect KitchenAid to produce a coffee grinder that’s the best of the best, ready for generations of grinding.

Unfortunately, they have not.

The KitchenAid ProLine Grinder is a flawed machine, and the flaw comes down to the design and manufacture of one important part.

Let no one say that the grinder itself isn’t a beautiful design. It lifts styling cues from the Mixmasters of the past, and uses a hopper and container system that reduces static fly-away issues and keeps the device looking really clean. It is darned heavy as well, just like your Ma’s Mixmaster.

But users will notice that this is not the machine for grinding espresso. Not even close. Espresso requires a very fine grind, in some instances just microns sort of a fine powder. It also needs to be very uniform in consistency or the pressurized water will sneak by the “boulders” in the puck and yield a watery shot. This machine was never able to grind to anywhere near this fineness. Even after several attempts at re-calibration, the very best I could get was a chunky grind applicable for drip coffee. If you’re interested, here’s KitchenAid’s page on cleaning and recalibration.

Chunky, non uniform fragments of coffee at step 5.5 out of 8 (8=finest)

So what’s up with this problem? An assembly problem? No, it’s a beautiful machine. An issue with the hopper? Nah. It all comes down to what may be the very heart of any coffee grinder: the burr plates.

The burr plates are the teeth of the system. They break up the coffee beans into small, hopefully uniform particles of ground coffee. The grinder has a powerful, slowly rotating motor that will smash the beans as they fall between two burr plates. One plate is spinning, the other is fixed. A good set of burr plates will cut into the beans instantly and pulverize them to a specific uniform consistency.

But not in the KitchenAid. The edges of the cutting pattern has very little of the sharpness needed to bite into the beans. As discussed on several internet forums, the plates seemed to be cast from a metal that loses what little edge they have very quickly. I noticed my grinder outputting a coarser grind within a few months of use. Cleaning and adjusting did no good, and after a recent tear down for cleaning it seems the burr plate is no more than some textured ripples in the metal. This is after only moderate home use.

Image of KitchenAid Burr Plate
The Achilles’ Heel. Does that look like stainless steel to you?
Photo: Via Facebook

For the record, some 3rd party vendor sites indicate the burrs are made of stainless steel. I have examined the ones out of my machine and they are made of a completely different metal than the ones from my Gaggia MDF, which are clearly made from a very hard steel that holds its edge.

I have found a replacement set of burrs for the KitchenAid on an auction site. In a later blog entry I will compare new and old burrs and update the grinder’s performance.

The only other comment I have currently on the KitchenAid ProLine Grinder is the fragile ground receptacle. This small customized bowl fits perfectly under the grinding chamber, minimizing static flyaway. It also looks really nice as part of the overall design. The down side is the bowl is made of rather thin glass and will crack or chip with a forceful bump. Think wine glass sort of thickness. Because this bowl is constantly being handled, chances of cracking this vessel is pretty high. It’s not cheap either. A scan of online parts resellers show prices between 25 and 35 dollars in June of 2019.

We’ll see how the new burrs help, but if you’re considering this grinder for 200 dollars, I suggest holding out for another 100 dollars and getting a Barzata Sette or even a Rancilio Rocky. The extra dollars are worth the trouble.

A K-cup Familiar To Our Canadian Friends

In the States, you can pick up a rock and toss it in any direction … and hit a Starbucks.  In Canada, it’s another name and store.

Most Canadians will understand a visit to Timmy's."

Most Canadians will understand a visit to “Timmy’s.”

I spied a new coffee offering in my supermarket K-cup display.  This one is marked with a logo familiar to many who call Canada home. “Tim Horton’s” is very similar to Duncan Donuts here in the US, a nice little store that can be found pretty much everywhere.  They serve lots of good coffee along with some of the most decadent pastries I have ever seen.  Yes, they are mostly donuts and their variants, but I’ve personally never seen a collection of colors, frostings, sprinkles and fillings like I did at a Tim Horton’s in Ontario some years back.  They are everywhere, and they are always, always occupied with hordes of locals tossing back coffee and packing away calories to fight off the cold.

I had a cup of the standard drip, prepared “regular” which means sugar and cream.  It tasted quite satisfying, a dark, full bodied roast that stood up to the add ins.  Maybe it was the cool air, but I recall the smell of the brew to be particularly attractive.  It was full and fresh, just a few minutes old.  I had it with a glazed donut of some design and called it breakfast.  A happy memory which always leaves me wondering why “Timmy’s” as the locals sometime call their stores haven’t tried a legitimate expansion into the United States.  There’s always room for good coffee and donuts in my opinion.

Anyway, I was brought back to this experience when I saw Tim Horton’s cups in the supermarket.  I was only able to snag a decaf box, as all the regular seemed snapped up. (Hmmm…. maybe people DO know about Horton goodness here in the Southern United States).  While I would have preferred the regular for a test drive, I’ve been sampling the decaf over the past few days.

I was wondering if this K version of this memorable cup could live up to my expectations.  Rarely does popular coffee outlets make the jump to the Keurig Universe without bumps and jolts.  Horton’s was not an exception.

The actual cup is a rigid side version, not one with the expanding folds that are filtering into the market.  It worked without issue in my machine, and when set to the large mug size offered a slightly weak looking cup of decaf coffee.

The flavor of the coffee was a bit on the bright side, more of a medium roast than anything taking on a lot of roast characteristics.  It was by no means bold.  This particular K-cup yields better when set to a medium mug setting, and there’s no way to steal a second brew.  I want to say that the decaffeination process steals a good bit of personality from these beans and what you get is a cup that tastes … just okay.  Not horrible and I will finish the box, but not something you make a special trip for.  And it is certainly not in agreement with the robust and heat-giving cups that the real Horton’s serve north of the border.

This is not complete thumbs down.  It is a satisfactory cup of decaf, just nothing to write home about.  Especially if your home is in Canada.  I will keep an eye open for the caffeinated version at my local store and see if that fares any better.

Update: verdict on horton’s regular coffee k-cup

I was able to find and sample Tim Horton’s regular coffee in K-Cup.  Again, it was satisfactory, but not a coffee that you would want to drive across town for.  It is not the cup you’ll get at a Tim Horton’s Bake Shop.  The brewed cup is overly bright and thin, with some grassy aftertastes that I did not find overly pleasing.  Like the decaf version, this cup is simply “okay,” but not a brand you would consider paying a premium for.  Is it the exact same stuff they brew in the restaurants?  Perhaps, but the translation to the Keurig system and the very short brew time may limit how well this brew can match the store brewed cup.

The upshot:  If you have access to Timmy’s, simply drive in and grab a cup, maybe some baked goods.  You’ll spend about the same money as you would on a 12 pack of these cups and have a much better time.

Keurig works up a froth with Gevalia

Mocha Latte is the R rated version of chocolate milk.
I say that because Moca Latte has a smooth creamy favor.  It has a yummy mouth-coating quality that lingers like a melting malt ball.  It’s a kid’s dream, thick and luscious with a flavor so fat it hangs like a froth mustache on your upper lip.  But moca has some forbidden qualities as well.  It has the very grown up nip of a dark roasted espresso and a nutty fullness that wins out over the sheer sweet that children would prefer.  Most kids I know would take a sip and then stick out a tongue in defeat.  So close, but yet so far in children’s terms.  But a nice mocha can be just the ticket to the adult tongue.

But what has all this frothiness have to do with Keurig?  Drop in a cup and get a cup of coffee – no froth allowed.  Or is that actually the case?

Image of Mocha Latte box

Gevalia’s Mocha Latte “Kit”

Keurig gets complex with Gevalia’s Mocha Latte 2 part kit.

Gevalia, who has entered the K-arena with some wonderful coffees, as introduced a 2 part kit for preparing a frothy cup of moca latte.  The kit consists of a powder packet that is poured dry into the bottom of the coffee cup.  Then a quite ordinary looking K cup is placed in the holster.  With the machine set to a medium cup size, the hot water passes though the coffee …. and magic takes place.

2013-12-24 09.57.45

As the hot coffee hits the powder, a reaction occurs.  The powder in the cup begins to pop and sputter to life, creating a blanket of foam about a half inch thick.  As a man who grew up in the United States, I am reminded of a popular candy called “Pop Rocks” that would sputter and crack once exposed to whatever corrosive qualities my saliva contained.   You can give it a few stirs with a stick or a spoon to mix in all the powder, and you wind up with a cup of mocha latte that looks and smells pretty good.  There’s still a few pops and cracks, but that fades quickly leaving a nice cup of foamy drink.  A little squirt of canned whipped cream makes this an impressive looking treat.

The impressive fireworks aside, how does this powdered “latte” foam actually taste?  The best way is to tell you what it is NOT:

1.  It is NOT truly frothed whole milk with lots of fat and all the things that make a latte like this stick to your ribs, among other places.

2.  It is NOT Cremora on steroids.  It has a true coating quality that offers the impression of something containing significant milkfat.  There’s mocha flavoring in the powder as well, and while it isn’t overhelmingly “malted” it is a pleasant taste that works well with the brewed coffee.

3.  It is NOT an uncompromising replacement for a coffee house mocha latte.  You want the real deal, you’ve got to put on your coat and go get it or invest in a whole lot more equipment than a Keurig.

4.  It is NOT expensive in calories.  Gevalia clams 80 calories per serving.  You have to stay away from any extra sugar or whipped cream to stay on that target.

5.  It is NOT expensive in money, relatively speaking.  At the time of this writing, Amazon.com was selling in bulk (36 cups) for 1.22 a cup.  compare this to 4-6 dollars for a store made beverage and it’s a good deal.  Compare it to a nice, simple cup of really good Joe and yeah … it’s a bit of extra change.

Gevalia did very well with this tricked out powder and K-cup combination.  It is a worthy, quick and easy cup that you can offer a guest or whip up for yourself.  It is a great way to avoid a fattening desert and it will leave you feeling quite happy that you’ve had something naughty to drink.

The Coffee Whisperer recommends Gevalia’s Mocha Latte for Keurig!

Black and Decker coffeemaker recalled, 68 injured

A popular space-saving under cabinet coffee maker has been recalled by Black and Decker.  The recall involves about 159,000 units sold under different model designations.

Here’s a link to CNN’s telling of the story.

Are you being green, or are you being cheap?

When I was a kid, mom and dad would buy soft drink by the six pack.  We would open each 12 ounce can by it’s pull tab pop top.  I would quickly consider the killing power of the aluminum pop top, perhaps running my thumb daringly along one side.  Just as quickly, my tadpole brain would turn again to the sweet soda awaiting me.  With a practiced flick of my hand the pop top would go sailing into the street.  Or the grass.  Or into the water … but never in the trash.

I can't tell you how many of these I happily ripped from the top of soda cans.

A few long chugs later (young boys never sip carbonated drinks, you can’t build up a decent belch that way) the can was ready for disposal.  In those days the can was really a CAN, rolled and stiff.  It wouldn’t collapse in your hand unless you were Larry Czonka or that guy on “Kung Fu.”  I was limited to stomping on it with my foot, twisting it into an angular arc. Sometimes this too would find itself dropped into a bush or  behind a park bench.

The final littering crime was interestingly the one that concerned us the least.  We would take the clear plastic ring and often toss it into the waterway and watch it float away.  It was small, nearly invisible compared to the twisted metal can … but as we all know now, it was a danger to marine life and for all practical purposes it would never fall apart and go away.

Back in the 1970s, we didn’t really understand.  We thought it was all about keeping things pretty.  “Keep America Beautful” was the saying on TV.  But beauty was only a small part of it.  Something that every schoolchild knows and understands.

The first real anti-pollution campaign, circa 1971

Fast forward to modern day.  We are a smart, green, earth-loving population.  We also love our coffee.  So a great many people have raised an eyebrow to the Keurig system and it’s disposable plastic cups.  How can an educated, love-the-mama coffee drinker continually toss plastic and foil cups into the landfill with every cup of joe he consumes?

Some folks just shrug and toss back their java.  No belching, however.  There are others that look for a better, cheaper way to love their Keurig and love-the-mama.  And that is a reusable cup system.  We’ve looked a a few here at the Coffee Whisperer, and now here is one that seems too simple to work well.

But it does.

My-Kap is a small, plastic top that will fit into the open top of a used Keurig coffee cup.  It has the look and feel of a poker chip, and you have to fight the urge to flip it into the air like a movie gangster.  It has a hole in it’s center for the infusion of hot water.  If you’re like me, you’d guess this thing is too simple to work well in the long run.  It’s got to leak or make a mess or something.  But in practice working with it is very simple.

A My-Kap set, available from Amazon. Note the brush is NOT to scale.

You have to start with a freshly used K-cup.  Yes, you are reusing the plastic cup … and the paper filter inside.  Yes, I know.  Reusing a coffee filter?  It does sound bad, but in practice the offense is small.  More on that later.  Preparing the used cup is simple.  use a scissor or a small knife to enlarge the entry hole in the foil top.  You are trying to preserve the paper filter inside, so don’t get too crazy with your cutting.  Just enlarge the hole enough so you can get a finger in and start slowly peeling the foil back to the cup’s edge.  The foil might give away cleanly, or it might leave a small strip along the top of the edge.  This won’t matter, as the My-Kap slips inside the lip of the cup and form it’s seal there.

VIDEO: Preparing a used K-Cup Video

To clear the old coffee out of the cup, simply hold the cup under running water.  The old grounds are flushed out easily, and for coffee that’s reluctant to leave My Kap supplies a small brush.  The brush helps to clear out the folds of the paper filter with a few whisks.  The brush came with a 3-Kap retail package from Amazon, which cost about 10 dollars.

After cleaning, you can immediately reload the cup with coffee, or set it aside to allow the paper filter to dry.  I found I can fill a cup with about a heaping tablespoon of ground coffee.  A medium grind, or a grind intended for “drip” seems to work the best.  Once filled, simply press the My-Kap disk into the top of the cup, in a fashion similar to plugging a bottle with a cork.

Then, simply load the cup, and use it just like a regular Keurig cup.  The quality of the coffee is really pretty good, perhaps better than mesh screen based replacement cups, since those seem to deposit more sediment in the bottom of my cup.  The paper filter seems to block most of the sediment and gives you a fairly clean cup.

VIDEO: How to refill a K-Kup using My-Kap system

On the subject of the filters: it is easy to raise an eyebrow over reusing a paper filter.  The filter does absorb a good bit of the oil and fine sediment that would make a cup bitter.  But in practice, I found the contamination I expected wasn’t really very apparent.  I didn’t note a great deal of degradation over multiple uses and I didn’t detect any real “cross-contamination” between coffee flavors.  Now, I did not try this with a flavored dessert coffee with a strong additive, so your mileage may vary.  In spite of my findings, many folks would prefer a clean paper filter and the folks at My-Kup is providing paper filters and templates to construct entirely fresh Keurig cups.  I did not try the paper filters; as I think the hassle factor in “gutting” a little plastic cup and re-lining it with fresh paper totally negates the convenience of the Keurig system in the first place.  My advice, try the replacement kaps first, and if you can’t handle the old filter, move to a mesh screen solution.

VIDEO: Cleaning a My-Kap prepared Keurig Cup

I found a few negatives with the My K-Kap.
First, I found my assembled kups would leak around the top a bit.  This isn’t a show stopper, as the excess water simply runs around the holder and then down into your coffee cup.  There’s a wipe up factor, and the leaked water will leave some sediment that will, over time, goop up your holster.  Popping the holster out of the machine and giving it a quick rinse is simple and something you should do anyway.

Next, if you wish to reuse the used cup (I’ve gotten 5-6 uses out of a single cup, just turning the cup so the bottom hole is freshly punched each time) you have to rinse the silly thing out.  This involves removing the My-Kap insert.  You need to a tool to do this easily, as there’s no exposed edge for you to pry upward.  I used the handle of the supplied brush, or you can use the tine of a fork.  The folks at My-Kap have an accessory to do this, but a fork seems to work fine.  But again, there’s additional hassle factor, and that is not what made Keurig what it is.

My take:  I thought that the My-Kap was going to be a half-baked solution to reusing Keurig plastic cups.  I felt that the whole-cup solutions discussed elsewhere on this blog would clearly be the “right” way to tackle the waste problem (and cost problem) inherent in the Keurig system.  But I was wrong.  The My-Kap approach is simple, very cheap, and really not that much of a hassle.  You can get about 4-5 easy reuses of the old cup, radically driving down your cost per cup of coffee.  It works, and as long as you’re willing to deal with a paper filter that’s no longer virginal ( I like “seasoned”) it makes a pretty good brew.

Best of all, you’ve saved another few ounces of plastic from being landfilled.  There’s a pop-top sitting buried deep in a Florida landfill with my name on it.  I didn’t know any better then.  I do now, and with a small bit of effort I can save some money and in a very small way help keep the world beautiful.


Sam Glazer, The Man Who Made America Safe For Coffee, dies.

Prior to 1972, America boiled their coffee.  

The instrument of this torture was the percolator coffee pot, that would boil water, force it up into a basket of grounds and drip it back down into the caudron below.  Yes, by the end of the process you had heated brewed coffee to the boiling point and redripped it several times.  This made for a powerful tasting (note here that powerful did not mean “good”) cup of joe that would grow hair on your chest.  This ain’t the stuff folks stand in line for at Starbucks.

Then came a man named Sam Glazer.  He made a little coffee maker out of plastic and paper filters.  And he called it “Mr. Coffee.”  And the clouds parted.  And the people gave shouts of great gladness.   No longer would they have to drink 40 weight motor oil sprinkled with non-dairy creamer.  They would have a brew that was lighter, brighter and just plain good for the soul.  His coffee machine was a big hit, selling millions of units in a short period of time.  The addition of sports spokesperson Joe DiMaggio on television commercials made the Mr. Coffee machine a home and television icon of the 1970’s and beyond.

Everyone remember “Mr. Fusion” from 1985’s “Back The Future?”  Well, without Sam Glazer’s contribution to pop culture, Marty McFly’s DeLauren would have been running on percolated coffee.  Wow.

He passed away on the date of this entry, March 22, 2012.

The folks at NPR.org has posted an interview about Mr. Glazer, and how America rose out of the dark ages for coffee.  It’s a nice, compact read … I recommend it:   Follow here for the article.

Mr. Coffee commercial with Joe Maggio  for all who wish to see a blast from the past.

Thank you, Mr. Glazer.  Rest in peace.

What’s The Best Decaf Coffee Available?

I get asked all the time.

And my response is always cautious.  The question is way too subjective, and there’s about 20 different brewing variables that will impact how any one coffee will behave.  But if you want to know what I think is the best decaf available, I will.  But you need to tell me yours.

What makes a great decaf coffee?  Well, I think some decafs have a processed taste, like the bean has been also sucked dry of flavor as well as caffeine.  I look for a coffee that has a full, complex flavor.  I like something that satisfies not only my tastebuds but SMELLS good too …. in the bag and also in the cup.  I like something that relies on the bean characteristics rather than the sheer darkness of the roast to transmit taste to me.  Again, it’s the quality of the bean and the method of caffeine extraction that makes the difference.

My choice for best decaf coffee that’s widely available is:

Peet’s Coffee,  “Major Dickason’s Blend -Decaf”

My current favorite, Major Dickason's Decaf!

You can find this in many supermarkets or gourmet markets.  You can buy it directly from Alfred Peet’s company for 15.95 a pound.  It has what it takes to be considered an all-world cup of decaf joe:  full and rich, not a whole lot of unwanted roast characteristics, works for the nose as well as the tongue, and doesn’t have that nasty “I’ve-been-messed-with” over-processed quality that cheaper decafs have (think -“Sanka”).

That’s what I think.   I’ll always like this particular blend, but I can be convinced that the crown should go elsewhere.  Tell me what your favorite is and I’ll give it a spin here on the blog.

The Ekobrew Reusable K-Cup Review

The Keurig coffee maker can make good coffee.  It can make it neatly and quickly.  What it can’t do is make a good, cheap cup of coffee.

The problem is simple:  to make it easy and quick, the K-Cup manufacturers have to do a lot of processing to get it ready for you before you buy.  They have to grind, dose and seal each of those little cups.  All that processing equals greater cost for you, the end user.

But what if you’re willing to take on that processing yourself?  Buying your own coffee, grinding and packing it into a cup would certainly trim down the overall costs.  Keurig has a solution of its own:  The “My K-Cup” kit.  But at 17.99 at Amazon it is not the cheapest nor simplest solution out there.  This kit also requires you to pop out the cup holster for use, which is a bit more hassle.

But Keurig is not the only game in town when it comes to reusable cup solutions.  There’s the Ekobrew reusable cup.  It’s 10.99 at Amazon.

The Ekobrew jumps out ahead of the My K Cup on design and ease of use.  Instead of several individual parts, the Ekobrew is one single piece, including a hinged top that swings completely clear of the basket for easy filling.  There’s nothing to lose, and more importantly, nothing to remove from the coffee maker as the My K Cup requires.  Once loaded, it acts just like a regular pre-packed cup.

It is easy to load as well.  The My K Cup’s mesh basket is very lightweight on it’s own and needs a couple of stabilizing fingers to keep it from tipping while filling with coffee.  The Ekobrew has a bit more heft and stayed in place for me.  This isn’t a big deal, but I found that balancing the coffee bag, filter and spoon required one more hand than I came equipped with.  The Ekobrew scored points for me here.

Once loaded, just snap the hinged top closed and drop it into your coffee machine.  Unlike manufactured cups, there IS a specific orientation for the cup to sit … the writing on the cap must be toward you.  This positioning allows the exit needle at the bottom of the holster to fit into a recess molded into the cup.  Otherwise you’d punch a hole in the hard plastic bottom and probably ruin the holster.  It would be hard to make such a mistake, as the cup won’t “feel” right as you set it down in your machine… it would wiggle and rattle and I found myself rotating the cup looking for the correct “fit,” which I found inside a half turn.

Just run the Keurig as you would normally do.  Remember, there is a bit of exploration to be done here as you find the right amount of coffee and right serving size to best work for your tastes.  As with the My K Cup, it is advisable to stay with a drip grind for the cup.  Any finer and you risk clogging the mesh and making the brewing cycle too long.

Once done, I suggest rinsing out the cup pretty quickly, even while the cup is still warm from brewing.  This makes for easy removal of the wet grounds simply with a running tap.  Let the grounds dry and you’re in for some scraping and washing.  Do it, it only takes a minute while the grounds are still wet.

How’s the coffee?
I made some tests with the same batch I used for the My K Cup tests, Peet’s Major Dickason’s blend decaf.  I found it to be quite pleasing and robust, not too bitter or oily, which is something I worried about when using a non-paper filter system.  The only downside is there’s a good bit of silt left over at the bottom of the cup, a sign that some smaller particles slipped by the mesh and wound up in my cup.  This is not a big deal, ask anyone who uses a french press…. but be aware that you won’t want to see if this cup is good till the last drop.  You’ll wind up with a small taste of coffee silt if you do.

Who wins???

For my money, the Ekobrew takes it between these two “roll your own” solutions.  It preserves the Keurig’s simple use mandate, it is easier to load and pops out of the machine without an issue.  It is also about 7 bucks cheaper at Amazon and can be found elsewhere on the web for less.  Grab one and give it a try.

But what if you want to take the “green” thing even a bit further?  I mean, the Ekobrew doesn’t really recycle the old plastic cups, it just replaces it.  What about a system that really live up to the “save the mama” doctrine and puts those old cups back into service?  We’ll look at the “K-Kap” system next time.


Do It Yourself K-Cup: Keurig’s Solution

The idea is to save money.  Save the planet as well, a tiny little K-cup at a time.
I have always said the greatest thing about the Keurig is how darned convenient it is … pop in a cup, press a button and pop the used cup out.  Factoring in the clean up process there is no other form of coffee making that’s easier than this.  But the cost of that bit of convenience is rather high … about 21 dollars a pound of coffee, by my estimate.  How can you use the cheap stuff in your Keurig so it doesn’t cost you a fortune in little cups?  You use an aftermarket reusable cup, that’s how.

There are several different brands out there, each taking a slightly different approach to the “no deposit, no return” goal we seek.  Keurig has their own, called “My K-Cup.”  The “My K-Cup” is the most elaborate of any of the reusable solutions I’ve seen, not only having a rewashable mesh basket but an entire holster that replaces the regular black one that comes with the coffee machine.  The black one has the puncture needle in the bottom, and since the mesh basket has no need for this the gray colored “MyKC” omits this and simply funnels the coffee down into your cup.  So, or a holster, a mesh screen coffee basket and a screw on top, you will part with about 17 dollars at Amazon.  Not great, but not really that bad if you can go from 67 cents a cup of coffee to say … 35 cents.  The device would pay for itself in a single change of seasons.

But what sort of coffee does it make?

You have to practice with it.
Oh, sure … there’s little black markings inside the little black cup to help you get the right amount of coffee.  That is, if you can see the little black markings.  But the first set of brews were not all that good, a little off.  But with more practice and patience I was able to get it to a state of … just okay.  I got it to qualify as perfectly acceptable, drinking while doing other things coffee.  Not great, stop in your tracks and thank the coffee gods -coffee.  But that’s okay.  If you want heart stopping, bring tears of joy to your eyes coffee, you’d have a 750 dollar Rancillo Silvia on the counter, not a Keurig.  But there is some work ahead of you to get the most from this device.

I used some pretty good coffee to start with.  I got a bag of Peet’s Decaf Major Dickenson’s, which is a darker roast that should hold up nicely to the Keurig’s short brewing time.  I find that lighter coffees suffer with the K- treatment, the water just isn’t in contact with the grounds long enough to extract the lighter flavors.  Darker does better, and the Maj. D. did just fine.  I used pre-ground, as this is pretty close to perfect for drip (what the Keurig calls for) and the particles are pretty uniform in size.  If you grind your own, beware of the blade type grinder, as they chop the beans up and have very irregular size.  If you don’t have a burr type grinder (more expensive but worth it) just buy it pre-ground and keep the bag sealed to air whenever it is stored.

I found a few quirks with the MyKC design.  First, you do have to swap holsters whenever you want to roll your own.  Not a big deal at all, but I’ve already gotten frustrated calls from home when I forgot to put the original holster back in and a family member couldn’t get her regular cup to work in the machine.  Loading the coffee in the mesh bag was a challenge because you need three hands:  the basket/holster won’t stand up on the counter due to the holster’s tapered bottom.  If you have holster in one hand, coffee spoon in the other, then you need to hope your bag of ground coffee won’t fall over while you’re spooning out the dose.  I found a way around this:  I stand up the mesh basket/holster assembly in a demitasse cup while I hold the spoon and bag in my now-free hands.  The lid screws on easily, but you are warned not to over tighten …. the plastic might break.

Actually brewing with the MyKC is no different than any other K-Cup device.  The brew runs out the bottom and a shot of steam/air clears the upper piercing needle.  I noted that the flow of coffee seems faster and greater than with a regular plastic cup.  I wonder if the additional time the water is in contact with the grounds gives the standard cup an advantage, allowing a little more extraction and a fuller flavor.  I found that a full basket/large mug setting got me a decent flavor and boldness.  I think that running a small mug would make it quite strong … maybe to some folks taste, but if I want strong I’d rather use an espresso.

Cleaning is simple, but I recommend doing it immediately after brewing.  Just pop out the assembly, pop open the top under running water and rinse out the basket.  You don’t want the grounds to dry to any degree, as they will “set” in the basket and turn to a hard crumbly substance.  This makes for a clean up thats at least twice as long and will mean lots of coffee grounds under your fingernails.  Just do it when it is wet, and it will flush clean with just holding it under the tap.

All the parts are machine washable, and I’d recommend that after a few days.  The coffee oils do cling and begin to discolor the plastic.  Keeping parts like this perfectly clean is important for flavor, so make a point to run them through with the dishes when you think of it.

All in all, My K-Cup is a good add on for the Keurig.  Points off for the additional hassle of having to change cup holsters and NOT being able to stand the holster up while filling with ground coffee.  Points on for a well built and easily cleaned mesh basket that looks tough enough to last a good long time.  Keurig also sells extra baskets so you can reload for guests with a minimum of rinsing and drying.

There are other choices in the “roll your own” category of K-Cup replacements.   We will look at another popular choice, the eko-brew, in the coming days.